With score editing, the visual appearance of the music is probably on of the most difficult tasks. Harmony Assistant offers a wide range of options, which control how the score is going to look when printing.
Control handles[]
| Ctrl+T | |
Control handles are a collection of very useful tools which control page margins, staff and bar options, etc. These tools include:
- The staff menu, which is probably the most widely used function of control handles.
- Staff handles, useful to position individual staves and design spacings between staves. These handles take the shape of a triangle facing rightwards, displayed immediately after the staff menu. They are moved by clicking and dragging them up or down with the mouse. This will result in altering all the similar handles used to control the same staff, in whatever group it is displayed. Dragging the handles while holding the Ctrl key or with right-click instead of left-click will only affect the current handle only. Holding the Shift key will affect all staves in the score, while holding the Shift key and dragging with right-click will result in altering all the staves belonging to the current group. There are several types of such handles, including:
- Staff area handles, represented as blue arrows, which appear above the first staff on the page, as well as under every staff. They control the staff area, (the area which can be used to input symbols and other objects on the staff). Using these handles, one can adjust how much space is reserved to a staff, and hence the distance between staves. No other handles can exceed the boundaries defined by the staff area. Staff area handles can be also grabbed from the small red and blue area between two staff menus.
- Staff location handles, drawn as simple red arrows, used to change the vertical location of the staff itself, within the limits established by the staff area.
- Bar number handles, displayed as red arrows with an N, which control the displacement of bar numbers, if these are displayed.
- Lyrics handles, displayed as red arrows with an L. Similarly to bar number handles, they control the lyrics lines (if there are multiple such lines, the handle will mark the top of the first line).
- Chords handles, which are represented as red arrows with a C, have identical functionality and manage chords.
- Tablature handles, which are red arrows with a T, and are manipulated just like bar numbers, lyrics and chords.
- Bar headers, used to display the bar number, and to access the bar menu.
- Bar handles, which are, similarly to staff handles, used to maneuver the appearance of bars. They also take the form of a triangle facing down, and are placed right below bar headers. The same mechanism of mouse dragging is used, although the only available option is Shift+click, which causes the current change to alter all bars. There are fewer variations of such handles, these being:
- Bar size handles, controls who can only be used when automatic bar size calculation is disabled from the Engraver mode settings. They control the width of bars, but once this manual mode is set, automatic calculation will be impossible to compute, unless automatic bar size calculation is enabled, which removes the manual bar sizes values.
- Bar area start and end handles, which mark the beginning and the ending of the area in which notes are displayed inside the bar. To control distances between individual notes, see the Engraver mode.
- Page handles, all displayed as squares, which are used for changing the overall appearance of a page. These include:
- Red handles, which are used to change page margins.
- Green handles, defining the area of the header section.
- Purple handle at the top of the first page, defining the offset of the first group in the score.
- Cyan handles (at the bottom of a page), defining the area of the footer section.
Distance values[]
| Ctrl+Alt+T | |
It is possible to visualize the distances set up using control handles. All these distances are displayed in centimeters.
Paper size[]

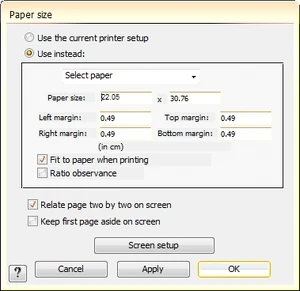
The paper size setup dialog
Harmony Assistant determines the size of pages by using data from the selected printer. It is possible, however, to define the size of pages manually. Doing this can be useful if the user desires to print the score on another printer, publish it to the web, or print (export) it as a PDF file.
Using the paper size dialog, one can choose settings regarding the virtual paper space, as well as other miscellaneous settings.
When the "Use current printer setup" radio button is selected, the program will leave the page size to the size defined by the printer, so therefore optimal for fast printing. By choosing "Use instead:", the paper size is going to enter manual mode, where width and height are specified by the user. If this mode is selected, other controls are activated. Below that button, there is a drop-down menu of presets with common formats. Here is a list of these formats:
| Name | Width | Height |
|---|---|---|
| A4 | 20.99 | 29.7 |
| Letter US | 21.59 | 27.94 |
| Legal US | 21.59 | 35.56 |
| B5 | 18.2 | 25.72 |
| A5 | 14.82 | 20.99 |
| B4 | 26.81 | 37.5 |
| A3 | 22.05 | 30.76 |
| Tabloid | 29.03 | 44.31 |
| Statement | 14.99 | 22.65 |
| Hymn | 15.63 | 22.01 |
| Octavo | 18.2 | 27.76 |
| Executive | 20.11 | 26.46 |
| Quarto | 22.65 | 28.5 |
| Folio | 22.65 | 34.11 |
| Concert | 23.92 | 31.57 |
The width and height columns refer to the portrait variant of the page format; the landscape variant is calculated by inverting width and height values.
Next, there are the actual page setting text boxes, where one can specify the size of the paper and the margins. Note that these margins differ from the margins controls available when using control handles, as those margins cannot exceed the boundaries of the page size, and they are calculated relative to these margins.
The "Fit to paper when printing" option refers to scaling the image at print time, so that when the printing occurs, a page as shown in the program fills perfectly a printed page. This might however cause a distortion if the aspect ratio of the virtual page is not equal to the one of the printed page, and a fix to this is the "Ratio observance" checkbox, which, if checked, prevents that from happening.
"Relate page two by two on screen" only affects view inside the program, being just a helping feature. It groups pairs of pages, so that the user can have a basic preview of how pages would look when inserted into a book. With "Keep first page aside on screen", it can be adjusted whether the first page is an even or odd.
The screen setup dialog, accessed with the homonymous button, is a tool for adjusting virtual and real space. At a scale of 100%, the page displayed on screen should normally be full size (1:1).
Page mode options[]
Inside the Page mode setup menu, there are several various options for controlling the score appearance. These are described in detail below:
Print infos on first page[]
Only when this is activated, the Title, Composer and Comment fields are drawn on the first page of the score.
Repeat the clef on every line[]
Conventionally, the clef symbol is displayed at the beginning of every line in a score. If the user desires to hide the clef from the beginning of lines, this option can be used. The main difference between this method and the method of hiding the clef from the clef editing dialog is that disabling "Repeat clef on every line" does not affect the original clef, which is still visible. More than that, the setting is global, so if a clef change happens, the same rule will be applied.
Display clef change on previous line[]
In some notation styles, whenever a clef changes at the beginning of a line, the new clef is also displayed at the end of the previous line, for easier noticing purposes. This is what this option if for. Note that this setting also applies to time and key signatures. The effect can be achieved manually for separate clef changes or time and key signatures by using the "Cautionary display" feature in their respective dialogs.
Jump and target on all staves[]
Part, jump and target symbols like volta or segno symbols can be either displayed on all visible staves (option active), or on the topmost staff (option inactive).
Justify bars[]
This setting is vaguely similar to a text justify setting in a text editor. When bars are justified, all the rightmost bars' ends are aligned. This also affects bar widths, and when manually adjusting bar sizes, it might be better turning this setting off, as it is easier to control bar sizes without them continuously moving.
Don't cut staff blocks[]
If a page is filled with staves, a new page is started. When the score contains more than one staves, it is possible to keep the staff group intact (option active) or allow it to be split (option inactive).
Justify groups on the page[]
Similarly to the "Justify bars" setting, this makes staff groups be spaced so that they fill an entire page. Again, it would be recommended to disable this option while designing the spacing between staves.
Justify last group of the tune[]
This specifies whether the last staff group visible on the score should have justified bars. This does not have any effect if "Justify bars" is disabled.
Add lyrics at the end[]
When enabled, this will add an additional page at the end of the score, where all lyrics are displayed.
Add chord grid at the end[]
As with "Add lyrics at the end", this adds a page at the end of the score, displaying the chord grid of the entire score. Note that if both "Add lyrics at the end" and "Add chord grid at the end" are enabled, they will be on separate pages, the last page being the chord grid.
Allow multi-rest bar[]


A multi-rest bar
A multi-rest bar is a bar which contains a single symbol representing a number of consecutive empty bars, used for saving space, or easier calculation. Note that anything, from a tempo change, a dynamic or a double barline present on a staff can break a multi-rest sequence.
Allow multi-repeat bar[]

A multi-repeat bar
A multi-repeat bar is similar in concept to a multi-rest bar, except that instead of empty bars, it compresses bars which contain the repeat symbol. Such a multi-repeat bar, represented as a repeat symbol with a number above it, does not indicate that the previous n bars should be repeated, but rather the previous bar should be repeated n times.
Number of successive bars[]
This menu is related to the two previous options - "Allow multi-rest bar" and "Allow multi-repeat bar". A sequence of empty or repeating bars will only be considered as a multi-rest or multi-repeat bar if the number of bars in the sequence is equal or larger than the number specified inside this menu. By pressing the "Other..." item, the document printing options dialog will be displayed, which contains a "number of successive bars" field for editing.
Don't print empty staves[]
When a staff line contains a staff which does not have anything but rests, that staff is omitted from the particular line. This can be for example very practical in miniature scores. Note that if the whole line contains only empty staves, the line will not fully disappear, as the first staff will be printed.
Except the first time[]
Related to the previous item, this cancels the erasing of empty staves for the first line in the score, so that a reader can know which instruments are present through the entire work.
Don't print empty groups[]
While "Don't print empty staves" leaves a single staff if a group is empty, "Don't print empty groups" also removes that staff, so the whole group is hidden. This option is ignored if "Don't print empty staves" is disabled.
Force number of bars per line[]
This is a simple way of designing a score to have a constant number of bars in a line, rather than manually editing bar widths, or setting which bars should end a line. After clicking, a simple dialog will be shown, which contains a textbox asking for the quantity of bars in a line that should be calculated. The resulting bars will be equal in width, no matter what their content is. Note that there is a minimum limit for the bar size. If set to 0, this procedure will reset the automatic calculation of bar sizes.
Force number of groups per page[]
This command is similar to "Force number of bars per line", as it forces a number of groups that can appear inside a page. This will affect distance between staves, and has a limit that cannot be exceeded.
Force number of pages[]
Changing the number of pages is done by modifying the scale at which everything inside the score is drawn. On the other hand, it will not affect bar sizes or distance between staves, and might be a more elegant solution for getting a score to fit inside a given space.
Avoid system split[]
This script first checks whether the "Don't cut staff blocks" option is enabled (a common cause of staff groups being broken), and if it is not, it enables it. After this, the script checks if there still are split systems (which can now only be caused by the number of staves being too large to be printed inside a single page). If no problem is met, a message stating "Your score is already OK." is thrown; otherwise, the overall display scale is changed.
[]
| Ctrl+E | |
| Ctrl+Shift+E | |


The header/footer edit dialog
These are special fields that are present at the top and bottom of every page in the score. The interfaces designed for editing them are identical. To edit the header or the footer, one can either use the menu or double-click on the field itself, which will bring up the header/footer dialog. In here, there is firstly a list containing special text commands that can be inserted inside the text data. The align left, center and right text boxes contain the actual data that will be displayed on the score. This can be plain text combined with the special text commands available from the list above, or simply by entering the wanted special text sequence. It is possible to choose a custom text style, by using the additional floating window.
When "alternate odd-even page" is selected, the left and right fields are swapped according to whether the page is odd or even (reference is taken from the first page). The two next checkboxes are used to draw a horizontal line above or below the text.
A preview of the result is shown in the box below. The page size is not considered, and neither are the offsets, which can be specified in the three textboxes below. Note that these offsets can be also modified by using control handles.
The final checkbox, "Not on first page", simply toggles the displaying of the header or footer on the first page of the score.
The Engraver mode[]
| Ctrl+E | |
| Ctrl+Shift+E | |
The Engraver mode is a system that manages the horizontal displacement of symbols by having spacing values for different types of symbols and other factors. Without the Engraver mode active, every symbol displays a spacing directly proportional to its duration, ignoring any accidents, grace notes or lyrics associated to it. This way, in some cases, graphical overlapping may occur. The Engraver system can be customized through the Engraver mode setup dialog, which offers a range of predefined styles, and allows the user to set up a profile which can be saved. The dialog interface is self-explanatory, except for the "Enhanced mode" option. This setting compresses certain notes containing accidents in such way that the overall distance between notes in that bar is balanced. An important feature in this dialog is the "Compute best bar width" checkbox, which, when enabled, automates the calculation of bar sizes.
Display setup[]
Perhaps the most complex side of score appearance customization can be achieved by using the display setup dialog. The dialog contains a large amount of sections (or panels) listed on the left, a number of controls which differ for each section, a preview field in which all sections show how specific data will look like, according to the given parameters, and a few buttons like "Default", which stores the current settings as default ones, so all newly created scores share the given options, or "Factory", which resets the data from the current section or all sections to the factory settings.
When changes are made to one of the sections, so that the parameters differ from the factory settings, a red star is displayed at the left of the section name.
The sections that belong to display setup are described in detail below.
General[]
The general section offers a few important settings that do not belong to any of the other sections. At the top, there is a possibility to choose whether ghost rests should be shown or hidden. Then, the option to toggle between accidentals applying only to the octave in which they appear, or to all octaves. An important thing to remember is that in standard notation, accidentals are applied only to the octave in which they appear. Another switch is the "Join parts" checkbox, which could be better understood by trying and seeing the result in the preview area. This only applies to volta symbols. The next option allows replacing the standard quarter rest (or crotchet rest) symbol with a symbol used in older notation. The last option is a list of available musical fonts in which the score can be displayed. This has the same effect as applying the similar setting to every staff in the score.
Line[]

From left to right: Left line (default), manual bar line method, no right line (default), right line
Here it is possible to thicken or thin the staff lines. While horizontal and ledger line have obvious uses, the left and right line are lines that are drawn so that they "merge" all staves (not that this has nothing to do with the concept of joined staves or staff groups). The right line is not displayed by default, as a bar line is either way visible at the end of the staff. To display the same effect at the beginning of the staff, a different method must be approached:
- From barline tools, select the default barline (thin continuous vertical line)
- Insert the barline so it is displayed right after the clef
- Alt+Double-click it, or alternatively use the menu entry Score > Edit breaks...
- Select the particular "break", if not already selected
- From position, choose "At the beginning of the bar"
Unfortunately, for achieving this effect on all staves, this will be required on every staff system.
Key signature[]
From the Key signature section, one can assign all sorts of spacings, not only related to key signatures, but generally everything that applies to a clef change, key signature and time signature. "Space before clef" can be used to create some sort of margin effect. If however it takes a negative value like -16, the first clef on the staff will not be displayed correctly, being masked by the staff area boundary. The several sliders' effects can be visualized in the preview area. The "Space between accidental" does only affect key signatures; accidentals associated to notes can be configured from the Accidental section.
Bar line[]
In this section, various bar line settings can be set. As always, you can customize line thickness, the distance between double bar lines, the appearance of dashed lines. The term crotchet, which usually in music refers to a quarter note, here literally means its translation from French - which is hook.
Note[]
As the name says, this section defines the appearance of notes. A quite useful feature that is commonly required in modern day notations is the "Beam split on half-beat", which affects the appearance of groups of sixteenth or shorter notes (see how the preview is modified). The notation style can differ from score to score, so it could be useful to keep an eye on this feature. "Slur on grace thickness" only affects slurs used for graces. For legato between notes, see Slur.
Accidental[]
Again, as the name suggests, this section deals with accidentals. Here it is possible to set the minimal vertical space between two accidentals. The first calculated accidental is the one applied to the highest pitched note, and always remains close to the note. If the vertical visual distance between this one and the next accidental (in descending order) is smaller than the distance specified by the "Minimal vertical space" value, the later accidental is moved left (at the amount specified by the next slider - "Space between accidentals"), and the procedure continues. When the distance between the first accidental and some other accidental is finally larger than the distance limit, that "other accidental" becomes the new ground for further calculations.
Dot[]
This section is about the dot that is used to increase a note's duration by 150%. For the dot that is used to express a staccato effect or to be part of other compound effects, see the next section, Effect.
Dot visual settings include positioning, spacing and display size of dots. An additional option for setting dots' offset from notes who have a flag is available.
Effect[]
The effect section contains just two settings: A line thickness and a dot size slider. This happens because a large number of effects are made up only of lines and dots, the rest of them being either symbols who cannot be customized (for example the Fermata or the Gruppetto) or symbols which are based on text.
Tie[]
Ties have many options, and they are split between upward and downward ties, which can have different aspects, although the parameters are identical for both upward and downward ties (to switch between editing these two types, use the drop down menu right below the preview area). Play with the parameters and watch how the preview changes; it would be much harder to explain the meaning of each parameter slider.
Slur[]
The main difference between a tie and a slur is that, officially, ties can be used to bind only notes with the same pitch, who are going to be played together as a single continuous note, and slur can be used to bind notes with different pitches, which will be played in a more smooth manner. However, Harmony Assistant can use a slur to have the same effect as a tie (playing notes together). However, in this case appearance isn't changed accordingly, and slurs have their own individual appearance parameters, which is set from notes' options panel.
Multi-rest[]
Multi-rest bars are enabled with the Allow multi-rest bar option, and the symbol that represents them, along with the associated bar counter number, is customizable. It is even possible to change the font style of the bar counter.
Multi-bar[]
Multi-repeat bar symbols have very similar options to Multi-rest bars.
Lyric[]
This section contains options for defining the appearance of hyphens and melismas. A hyphen is a dash used when writing lyrics to show that a word is split into syllables which are usually sung on separate notes. A melisma is a symbol similar to an underscore (_), which is added to lyrics when a syllable must be hold on more than one note. The font of the lyrics is not defined globally, as it is definable when editing lyrics in place.
Tablature[]
As the title suggests, tablature display settings are configured.
Chord diagram[]
Chord diagrams usually associated with guitar notation can be particularized from this panel.
Text[]
From this panel, one can set text frame settings. To make a text have a frame, insert the sequence $X or $S anywhere in a text field.
Brace and Bracket[]
Braces or brackets are added when staff groups are present. However, these settings also affect braces and brackets used in Free objects.
Other display options[]
Besides the options described in this article, which are found in the first section of Harmony Assistant's Score menu (except for the first item - "Page mode", which is characterized in the score page), there are other ways of particularizing the way a score is displayed on screen or on paper. Some of these are depicted within score, and others, like views or printing options are explained in their respective articles.